Make Your Own Paper Air Planes
On this page you will learn how to amke your own paper air planes. If you have any ideas for air planes please click here. There will be a video and or instructions for each one. These are easy.
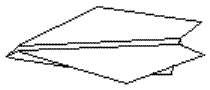
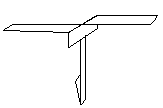
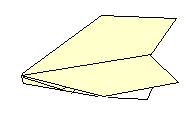
The Rapier Air Plane
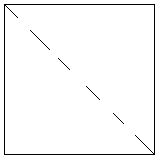
First take a rectangular A4 (8 1/2" by 11") sheet of paper and fold down the center dotted like on the picture . opening it out again afterwards.
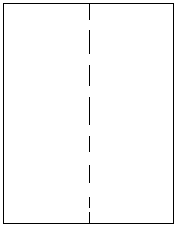
This is how it should now look like
Take the first 1cm (1/2") of the rectangular sheet and fold it up along the dotted like in the picture.

This is how it should now look like.
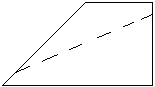
Fold the flap over and over until about 3/8 of the length of the sheet is folded in this concertina fashion as in the picture.This should give a heavy and thick front lip.
This is what it should now look like.
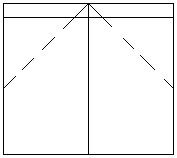
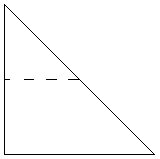
Now fold along the two dotted lines in the picture above, bringing the top edges into the center line and fold along the center line to give it as a side view.
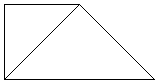
It should like this. Now you are all done and your plane should look like the diagram in the top.
How To Fly
How To Fly
- The rapier paper airplane is another great plane for trying to hit your teacher or lecturer with. It flies fast and true indoors exactly where you want it to go.
- Just hold it about 1/4 of its length from the nose tip and throw it overarm quite gently. If you want the plane to circle make one wing higher at the back than the other (but only slightly). This will make the plane circle with the lower wing towards the center of the circle. Be careful not to poke anyone's eye out though!
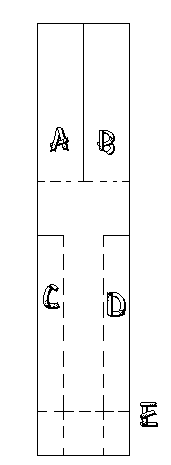
Here is how to make a paper helicopter.
- Cut along all the solid lines on the diagram to the right.
- Fold flap A forward and flap B to the back.
- Fold flaps C and D both forward along the dotted lines.
- Fold along the line E upward to give a weight at the bottom.
- Now this should look like the diagram at the top.
- You can scale up this model as much as you want. You just drop the model with the blades facing upwards and the weight at the bottom facing downwards for the best results.
- To get a full size diagram of the model to print off click on image and then print the image you get.
How To Fly
- Hold by the rectangle of paper beneath the blades and then let go pulling your hand out of the way very quickly. Everything about this helicopter is simple: making it and flying it. This is why it is my favorite paper aircraft.
Rocket Scince (a rocket experiment really cool)
Rocket

There is only a video for this one and listen carfully even though it may be weird.
The Flying Fish
I am not writting instructions because they video explains it all.
Paper Frisbee
Take a sheet of square paper about 6cm by 6cm (or 3inches by 3inches) and fold it diagonally across along the dotted line in
It should look like this.
Now fold the tip down along the dotted horizontal line.
It should look like this.
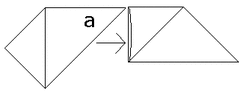
- You now have your basic repeating unit as shown in the picture below.. Make eight of these units.
- Put a spot of glue on the point marked "a" in th picture below and slide into the pocket of the next unit. Do this for all eight units and at the end you will have a complete circle similar to that in the diagram at the top of the page.
It should look like this.
You are now done. If you are having trouble make the paper frisbee look at the video. But the guy in the video says that it would be better if you also looked at the instructions. Here are some flying tips so you can get yours flying.
- Hold the frisbee as at the beginning of the animation to the left and flick your arm and wrist throwing the frisbee spinning at the quickest moment of arm movement.
- Unfortunately the frisbee does not fly well when thrown like a normal frisbee I am working on finding a tesellation that goes together to form a frisbee that flies like the traditional ones.
Specially desighned for you
there will not be a video for this plane. I hope that you engoy it.
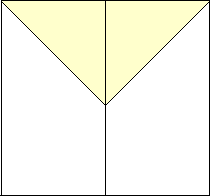
Firstly fold the sheet in half along the line like in
almos every other plane.
Fold the two top corners in to the center line to give the form in also like they do in every other plane just make the top 2 corner even on the middle line that you made .
Then fold the top large triangle over so that the two flaps formed in step 2 are underneath the large triangle. Your paper should now look like the picture.
This is now what your plane should look like.
- From the form the picture above, fold the two top corners into the center line again in such a way that you get the form in that has six triangle look at them they may be split.
- Now fold the small triangle up over the two flaps to make it look like the picture.
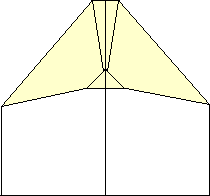
This is what it should now look like.
mFold along the center line so that the small triangle is on the underside of the plane on the outside along with the two flaps as shown in the picture.
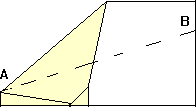
- Fold along the line AB on and then turn the plane over and do the same to the other side producing your plane.
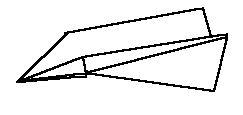
- Fold along the line labelled AB on the diagram first one way and then the other creasing really well. Tuck the triangular shaped depression inbetween the two wings to produce the plane. This stabilises the plane if you do not make it perfectly since to make it absolutely symmetrically is beyond my abilities.
That is how to do it.
Here is the origami plane 3
There will only be a video for this one since it explanis it well.
The Origami Paper Air plane #3.
There is only a video for this one.
Classic Dart
There is only a video for this one because the video showed me how to make it and I am the worst at that. This is my favorite.
The Glider
There is only a video for this one.
Medium Planes
Thes plane s are harder now. I would advise to try a few of the esier ones first.
The Dragon
Bob Rocks Plane
The Swallow Bird (Looks Like A Real Bird)
The Trapezium Paper Air Plane
The Nose Heavy Paper Air Plane
Hard
Here are the hard paper airplanes. You may want to try a few easier ones before you try these planes.
Cobra Paper Airplane
Oragami Paper Air Plane #2
The Sabartoothe paper air plane
